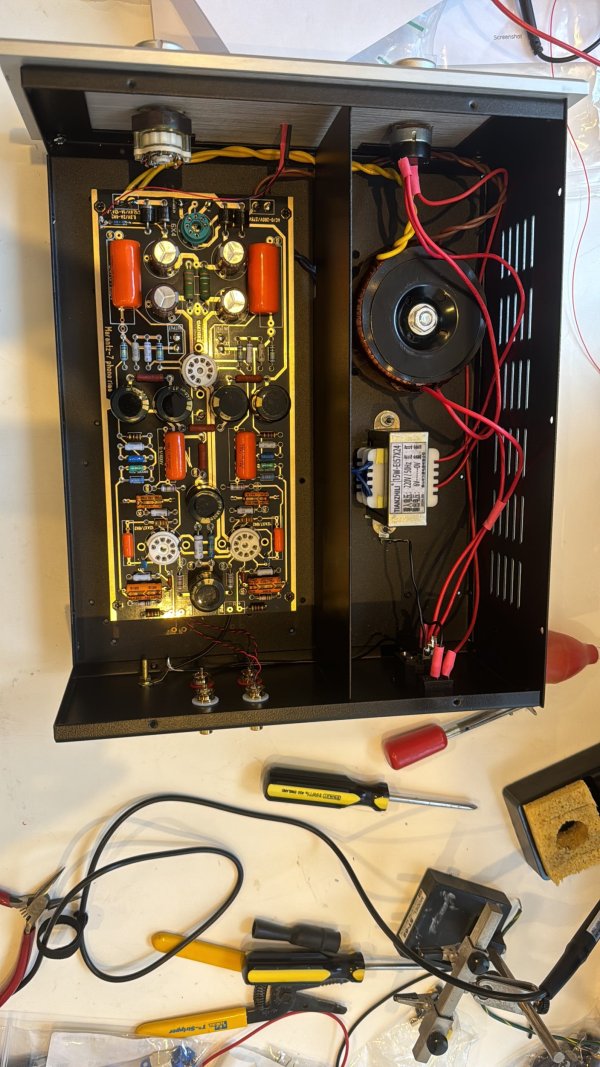
Viktor Khomenko (Foxbat), founder of Balanced Audio Technologies, has made a series of Youtube videos on this particular preamp. It is based on a PCB sold on Ebay: https://www.ebay.com/itm/3547632385...ar=624092303927&widget_ver=artemis&media=COPY
The Marantz 7 preamp is a full function preamp with phono as well as tape head input. It has several EQ curves for the pre-RIAA phono records, and NAB for tape heads. The phono/tape head section is based on three 12AX7 tubes. It has two amplification stages and a cathode follower output stage. EQ is applied by applying feedback from the Cathode follower output to the cathode of the input stage.
I have previously built a no holds barred balanced differential tape head preamp, with external shunt regulated power supply, for my Nagra T Audio tape machine. I initially had EQs for the two CCIR, NAB and Nagramaster, switched using relays. I have since hard-wired the EQ components for CCIR15 only to avoid switching.
For four track tapes, I have been using a Revox B77 with upgraded output card from Audvance. I am intrigued by the Marantz 7 circuit, as it will give me a more genuine 1960s experience with these four track tapes.
The seller also has a presence on Taobao, the Chinese version of Ali Express, at a slightly cheaper price. I also bought a chassis from Taobao, from a workshop that makes custom chassis but also sells a range of ready made ones in different form factors. The chassis I bought is based on the Kondo M7 phono. I bought a toroidal HT transformer and a filament transformer from another shop. The total cost came to 950 RMB, about US$135, shipping included. I also bought a couple of 6X4 rectifiers, and I already have a stash of 12AX7s (NOS Tesla ECC803S).
Then, it is just simply drilling the holes on the bottom plate to secure the board and the transformers, connecting the power, output and input wiring and making a low resistance chassis ground connection. The chassis comes with two positions on the front plate for rotary switches. I installed an additional power switch in one, and a rotary selector switch in the other in case I want to install addition EQ curves later.
The board comes with RIAA EQ, which I need to modify for NAB. Since the LF pole of the two is the same, I just removed the other components and put in a 7.2K resistor, which together with the pre-existing 6.8nF cap will give the 50us HF turnover.
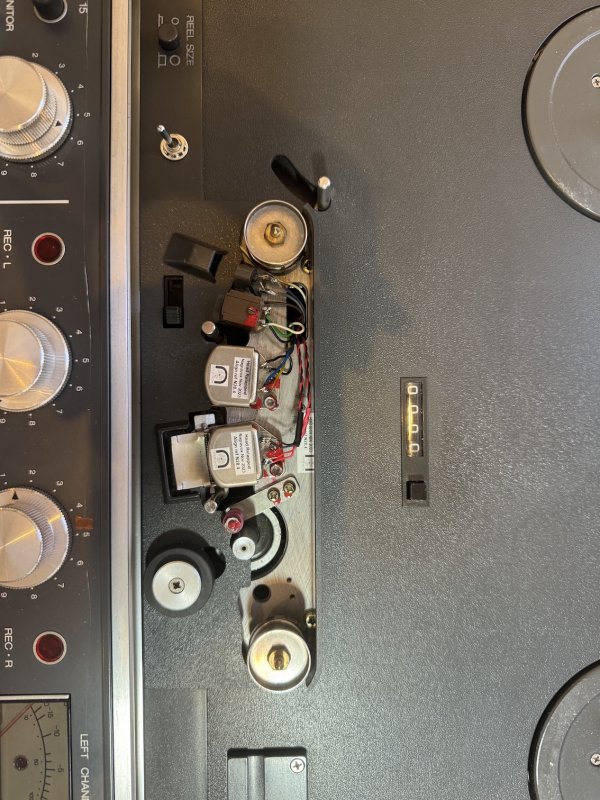
For the B77, I installed a switch to allow switching between external and internal playback electronics. There is conveniently already a hole on the chassis to the left of the headblock, probably for an optional feature that my machine did not come with. There was just enough space between the chassis and the face plate to accommodate a 4PDT toggle switch. I disconnected the cables from the head and reconnected them to the switch. I simply used a pair of twisted wirewrap wires to connect the head to the switch. I used the Gotham GAC3, my go to cable for my microphones, to connect between the switch and the preamp. A separate ground wire is connected from one of the screws on the headblock directly to the ground post of the preamp. There is an unused hole on the back of the machine, marked slide projector, that is perfect for the exit of the cables. I removed the plastic cover and slid the cables through the hole. At the other end, I connected the shield of each cable to a separate wire ending in a spade to connect to the ground post of the preamp. By separating the shield from the signal wiring, I have the option of connecting the head as a floating source to the balanced input of my other preamp.
Using the MRL calibration tape as reference, the HF is almost spot on, with about 1dB down at 16kHz. The LF was however way off; +6dB at 32Hz and +4dB at 64Hz. Changing the LF resistor from 680K to 300K got me to the ballpark of +1.5dB at 32Hz. I have ordered trim pots to further adjust the response.
I initially connected the signal ground to the power supply ground, but there was a low level hum. After cutting the connection, the preamp became dead quiet.
The connections of the cable shields to signal ground are essential. One connection fell off the ground post and the result was a horrendous noise from that side. The motors in the tape machine generate a lot of stray fields.
Like Foxbat, I was pleasantly surprised by the sound quality of this little preamp. Compared to the solid state Audvance board, which is already a very significant upgrade, the M7 has a richer, more colourful string tone. There is better depth of image, with better separation during busy passages. On the other hand, the internal board seems to have more solid and impactful bass. The preamp output is about 15dB lower than the board.
As it is, the preamp is a very worthwhile upgrade for most tape machines, especially at this price. The components that came with the board are pretty high quality, but there is further room for improvement by upgrading the coupling caps, increasing the value of the PS filter caps (but don't go overboard), and perhaps installing a filter choke for the HT supply.
Many thanks to Viktor for sharing his discovery with everyone. I had a lot of fun putting this little project together.
Attachments
Last edited:


