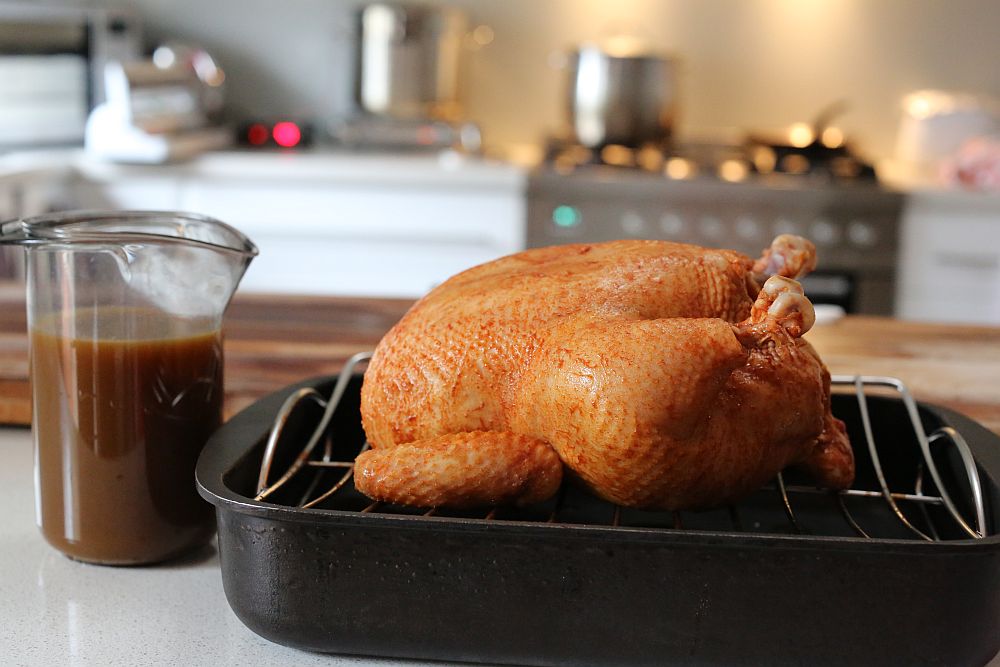
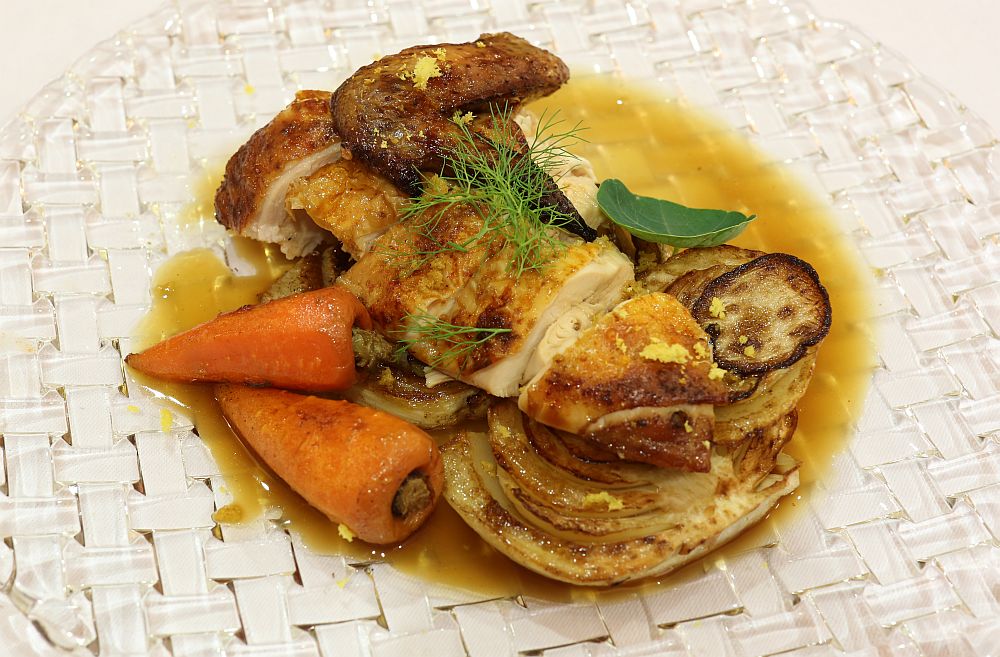
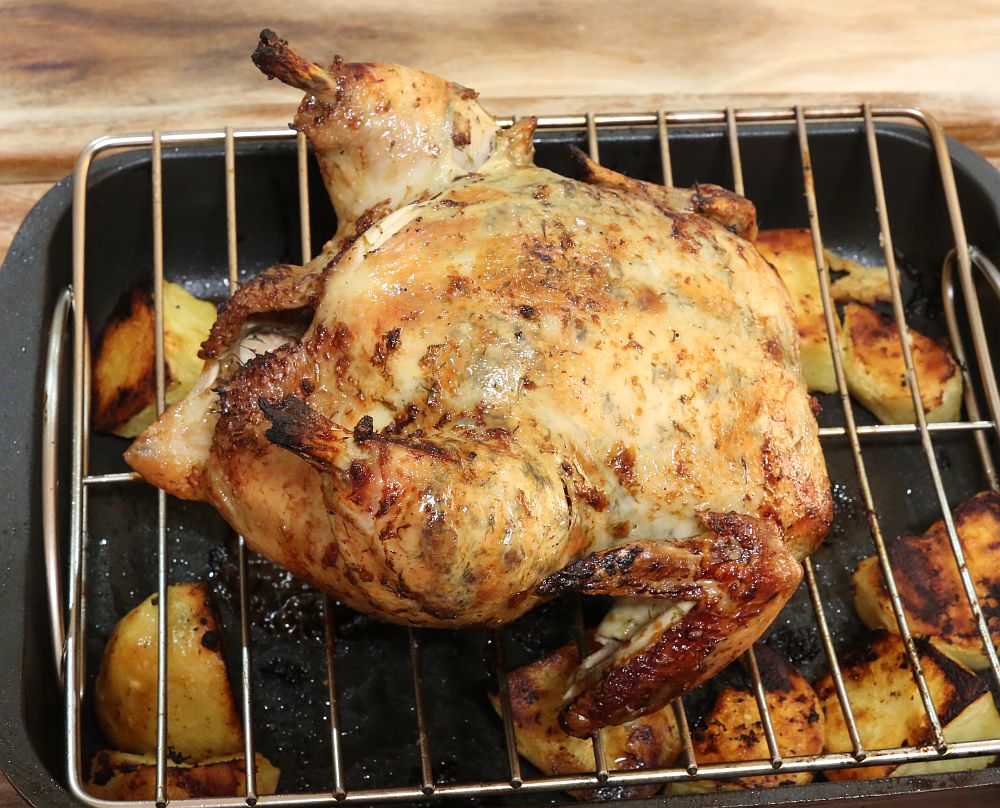
This is a roast chicken injected with stock made from another roast chicken and then cooked to perfection. The double dose of chicken results in an incredibly juicy chicken with a double hit of chicken flavour.
By now some of you might realize that my recipes may not be the easiest to follow, but that is because I do research, do a lot of experiments, and try to come up with the "best practice" recipe along with a rationale for doing so. What follows is a discussion on cooking chicken. The recipe is in the next post.
TL; DR
In summary, my current recommendations are:
- Cooking temperature: breast 60, legs 65.
- Stuffing: no
- Trussing: no
- Cooking position: rotisserie; alternative slow roast with high heat finish
- Brining: injection brining, 4% - 6%
Cooking temperature: in some other places my recommendation of cooking the breast to 60C and dark meat (thighs/drumstick) to 65C is controversial. However, Heston Blumenthal recommends it (see 3:30 point in this video as do a number of more modern books. Cooking a chicken to higher temperature results in overcooked chicken, which manifests itself as dry meat. Note that the different cooking requirement for breast and leg meat will strongly influence your choice of cooking technique.
Stuffing vs. no stuffing: chickens should not be stuffed. Stuffing a chicken has a number of negative effects: it slows down cooking time by preventing convection currents within the cavity, the stuffing itself needs to reach a minimum of 60C and held for 15 minutes to guarantee safety (during which the vulnerable breast will overcook and skin start to burn), and the stuffing itself takes on a soggy texture. Contrary to myth, stuffing does not make a chicken more moist by "basting it from the inside". The moistness of chicken meat comes from other factors (see below).
Trussed vs. untrussed: after years of trussing my chickens, I have stopped doing so. The reason being - trussing reduces the circulation of air around the thighs, effectively increasing its thickness. Given the thighs need to be cooked to a higher temperature than the breast, trussing only reduces heat conductivity and guarantees either undercooked thighs or overcooked breast. No matter what the cooking method, the legs should be splayed out from the chicken to promote maximum air circulation.
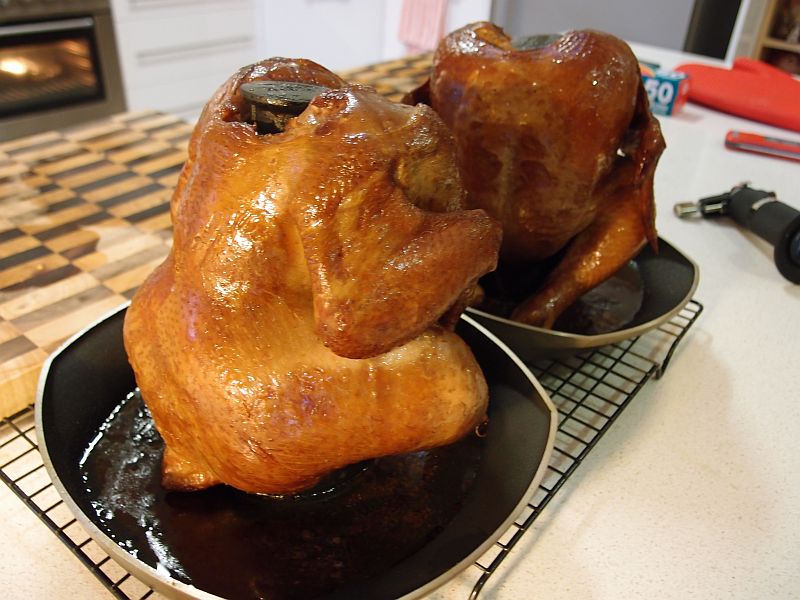
Wet brined smoked beer can chicken. Despite the beautiful glazed appearance of the chicken and the skin, the skin was rubbery. See discussion on brining below
Cooking position: should chickens be stood upright on a beer can, or cooked in a rotisserie, or cooked breast side up, or butterflied? Should they be slow roasted or roasted at a high temperature? If you think about it - your aims in cooking your chicken are: breast to 60, legs to 65, and crispy skin.
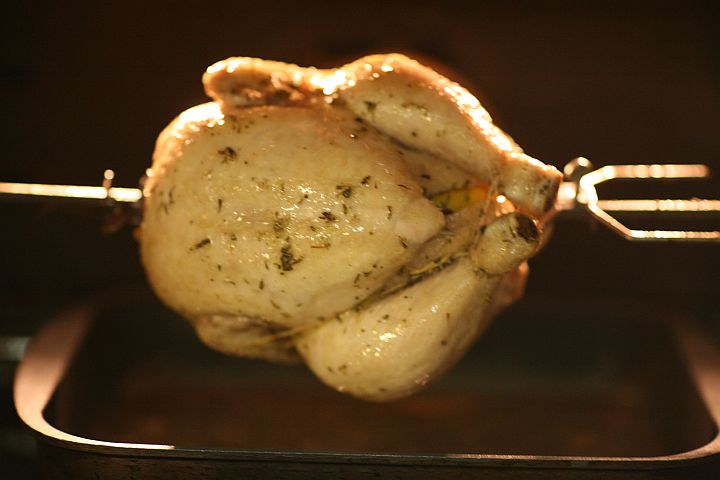
- rotisserie: in this case, one side of the chicken is exposed to a high blast of heat before it is rotated away from the heat source. The meat then rapidly cools down before it is exposed to the heat again. Furthermore, the constant rotation of the chicken ensures even distribution of juices. This really is the ultimate way of cooking chicken, but unfortunately not everyone has a rotisserie. Most of the heat in a rotisserie is delivered in the form of radiation, rather than convection.
- breast side up: (Assuming you are using a normal oven with the heating elements on the top and bottom). In this position, the breast meat will be closest to the heating element and most exposed to convection air currents, whilst the thighs (which need a higher cooking temperature!) are resting deep in the roast tin with less air circulation. This will overcook the breast. If you are going to do this, I recommend retarding the cooking of the breast by starting the cooking with the breast down so that the legs cook first on chicken rack set on a biscuit tin (not a roasting tin!) - this promotes maximum air circulation. When you turn the breast side up, check the temperature. If there is less than 5C difference between legs and thighs, place foil over the breast to retard cooking. In a kamado or Weber, the heat comes from the bottom. The chicken should be cooked breast up over indirect heat. Make sure you rotate the chicken 180 halfway during cooking to even out the cooking of both sides.
- beer can: contrary to myth, it is not the beer in the can that keeps the chicken moist. It is the cooking position. In a beer can chicken, the chicken is vertical and the legs are closest to the heat source and breast furthest away. This naturally ensures appropriate distribution of heat.
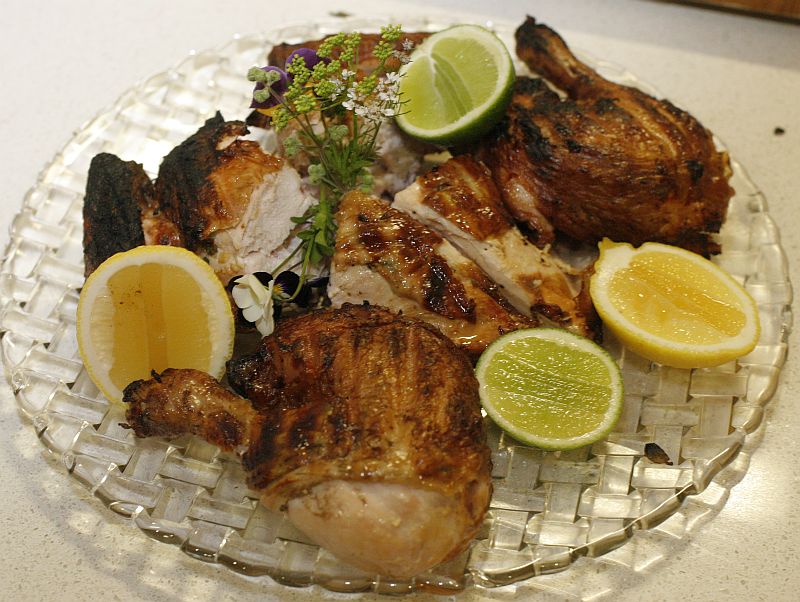
Butterflied chicken - note the breast is overcooked and slightly charred whilst the legs were moist. The major disadvantage of butterflied chicken is the difficulty monitoring the temperature and stopping the skin from burning. It involves too much guesswork.
- butterfly: butterflying a chicken maximizes the surface area and promotes the fastest cooking. It is rarely possible to achieve a different cooking temperature for breast and thighs with this method unless the breast is foiled. Because of its shape, consideration needs to be given to how to cook it. It is easiest to cook a butterfly chicken in an oven. In a Weber, it is impossible to cook it over indirect heat in a Weber without creative arrangement of coals. Cooking it over direct heat will burn the skin before the meat is cooked. I recommend arranging the coals in a ring around the butterflied chicken in a Weber, with more coals towards the legs. In a Kamado, cook it direct but breast side up over very low heat. When the chicken is 10C from the desired temperature, remove it from the coals and open the vents. Place the chicken breast side down to crisp up the skin over high heat.
- slow vs. quick roast: unlike pork or beef, chicken has very little collagen - so the idea of a slow roast isn't to render the collagen. Rather, the reason you slow roast is to make it easier to control the final cooking temperature. Imagine you are piloting a ship towards a harbour. You need to stop right at the jetty. You could either go full steam ahead and try to apply reverse thrust just before you reach the jetty, but chances are you will overshoot and crash. Or, you could steam up slowly and coast to the jetty. This is the same with chicken - a slow roast gives you a larger window of opportunity to remove it from the heat at the desired cooking temperature. How important this is depends on how good you are at monitoring your chicken! If you have a Maverick ET-732 (or similar) type temperature probe, you can react the moment the alarm informs you the temp has been reached.
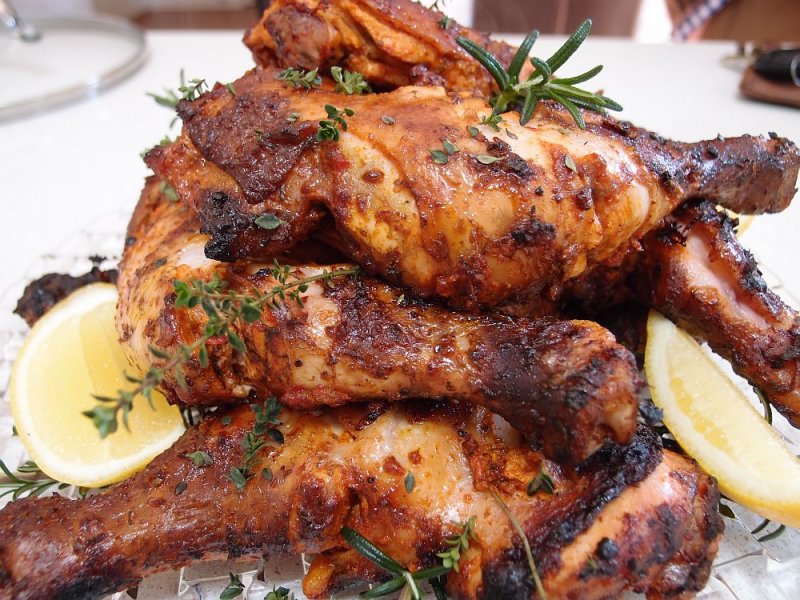
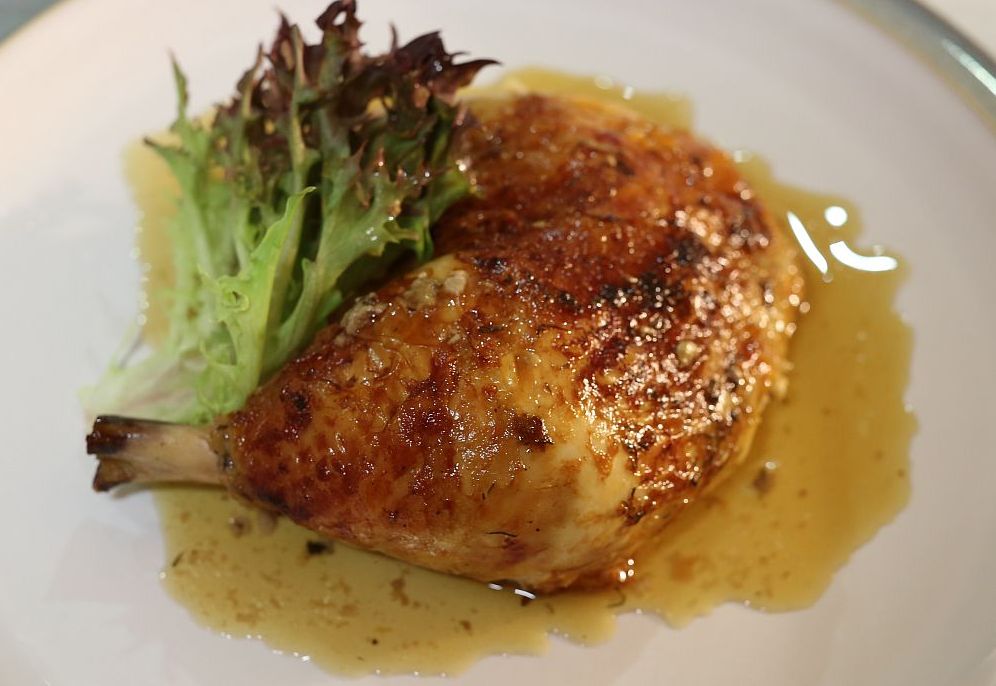
My peri-peri chicken, made with a brine-like marinade then cooked indirect until almost cooked, then finished over direct heat
Brining and marinades: chickens should always be brined. The reason: the salt within the meat promotes structural changes within the proteins which make the meat more tender. If you want to get scientific about it: the proteins maintain their 3D structure via a number of different types of bonds, but the most important is the positive-negative attraction between different amino acids. Na+ alters the charge of the proteins, promoting its unfolding. Also, the salt helps the meat hold on to water, causing less moisture loss. If you look up brining recipes, you will find a multitude of them - dry brines, wet brines at different concentrations, and injection brining. Which is the best? Well fortunately for you, I have done experiments!
- dry brining: not recommended. This method draws moisture out of the chicken and results in a taste and texture resembling cured meat.
- marinades: a form of wet brining but using far more concentrated flavours with less precise control over salinity. I have yet to come across a marinade recipe (including my own) which isn't subjective and variable. The results can be delicious, but really I didn't intend this post to be a discussion on marinading.
- wet brining: the most popular brining method. If you look up a number of books, you will see that some people (like Heston) recommends an 8% brine for 8 hours. Thomas Keller recommends a 5% brine for 12 hours. (NB: an 8% brine is 8g of salt per 100g water). I did an experiment where I brined three chicken breasts in different concentrations and found that the lowest concentration (a 4% brine for 12 hours) resulted in the most moist, succulent chicken - but unlike the other brines, a low concentration brine is not enough to season the chicken - so you have to add more seasoning afterwards.
Wet brining was my go-to method for the past year, but it has a major drawback. The same effect that causes moisture to hang on to the meat also causes moisture to hang on to the skin. I cooked beautifully moist chicken with rubbery skin for two years, trying all sorts of methods to crisp up the skin before I realized what was happening and junked the technique. My current recommendation is:
- injection brining: in this technique a brine solution is injected into the meat and allowed to equilibrate for at least 2 hours before cooking. You inject 20% of the weight of the chicken in brine - for a 2kg chicken you need to prepare 400mL of brine. The major advantage, apart from crispy skin, is flavour and cost. If you want a lemon or bay leaf flavour in your brine, you need to add much less to make only 200mL of brine as opposed to 4L of brine you need for wet brining!
By now some of you might realize that my recipes may not be the easiest to follow, but that is because I do research, do a lot of experiments, and try to come up with the "best practice" recipe along with a rationale for doing so. What follows is a discussion on cooking chicken. The recipe is in the next post.
TL; DR
In summary, my current recommendations are:
- Cooking temperature: breast 60, legs 65.
- Stuffing: no
- Trussing: no
- Cooking position: rotisserie; alternative slow roast with high heat finish
- Brining: injection brining, 4% - 6%
Cooking temperature: in some other places my recommendation of cooking the breast to 60C and dark meat (thighs/drumstick) to 65C is controversial. However, Heston Blumenthal recommends it (see 3:30 point in this video as do a number of more modern books. Cooking a chicken to higher temperature results in overcooked chicken, which manifests itself as dry meat. Note that the different cooking requirement for breast and leg meat will strongly influence your choice of cooking technique.
Stuffing vs. no stuffing: chickens should not be stuffed. Stuffing a chicken has a number of negative effects: it slows down cooking time by preventing convection currents within the cavity, the stuffing itself needs to reach a minimum of 60C and held for 15 minutes to guarantee safety (during which the vulnerable breast will overcook and skin start to burn), and the stuffing itself takes on a soggy texture. Contrary to myth, stuffing does not make a chicken more moist by "basting it from the inside". The moistness of chicken meat comes from other factors (see below).
Trussed vs. untrussed: after years of trussing my chickens, I have stopped doing so. The reason being - trussing reduces the circulation of air around the thighs, effectively increasing its thickness. Given the thighs need to be cooked to a higher temperature than the breast, trussing only reduces heat conductivity and guarantees either undercooked thighs or overcooked breast. No matter what the cooking method, the legs should be splayed out from the chicken to promote maximum air circulation.
Wet brined smoked beer can chicken. Despite the beautiful glazed appearance of the chicken and the skin, the skin was rubbery. See discussion on brining below
Cooking position: should chickens be stood upright on a beer can, or cooked in a rotisserie, or cooked breast side up, or butterflied? Should they be slow roasted or roasted at a high temperature? If you think about it - your aims in cooking your chicken are: breast to 60, legs to 65, and crispy skin.
- rotisserie: in this case, one side of the chicken is exposed to a high blast of heat before it is rotated away from the heat source. The meat then rapidly cools down before it is exposed to the heat again. Furthermore, the constant rotation of the chicken ensures even distribution of juices. This really is the ultimate way of cooking chicken, but unfortunately not everyone has a rotisserie. Most of the heat in a rotisserie is delivered in the form of radiation, rather than convection.
- breast side up: (Assuming you are using a normal oven with the heating elements on the top and bottom). In this position, the breast meat will be closest to the heating element and most exposed to convection air currents, whilst the thighs (which need a higher cooking temperature!) are resting deep in the roast tin with less air circulation. This will overcook the breast. If you are going to do this, I recommend retarding the cooking of the breast by starting the cooking with the breast down so that the legs cook first on chicken rack set on a biscuit tin (not a roasting tin!) - this promotes maximum air circulation. When you turn the breast side up, check the temperature. If there is less than 5C difference between legs and thighs, place foil over the breast to retard cooking. In a kamado or Weber, the heat comes from the bottom. The chicken should be cooked breast up over indirect heat. Make sure you rotate the chicken 180 halfway during cooking to even out the cooking of both sides.
- beer can: contrary to myth, it is not the beer in the can that keeps the chicken moist. It is the cooking position. In a beer can chicken, the chicken is vertical and the legs are closest to the heat source and breast furthest away. This naturally ensures appropriate distribution of heat.
Butterflied chicken - note the breast is overcooked and slightly charred whilst the legs were moist. The major disadvantage of butterflied chicken is the difficulty monitoring the temperature and stopping the skin from burning. It involves too much guesswork.
- butterfly: butterflying a chicken maximizes the surface area and promotes the fastest cooking. It is rarely possible to achieve a different cooking temperature for breast and thighs with this method unless the breast is foiled. Because of its shape, consideration needs to be given to how to cook it. It is easiest to cook a butterfly chicken in an oven. In a Weber, it is impossible to cook it over indirect heat in a Weber without creative arrangement of coals. Cooking it over direct heat will burn the skin before the meat is cooked. I recommend arranging the coals in a ring around the butterflied chicken in a Weber, with more coals towards the legs. In a Kamado, cook it direct but breast side up over very low heat. When the chicken is 10C from the desired temperature, remove it from the coals and open the vents. Place the chicken breast side down to crisp up the skin over high heat.
- slow vs. quick roast: unlike pork or beef, chicken has very little collagen - so the idea of a slow roast isn't to render the collagen. Rather, the reason you slow roast is to make it easier to control the final cooking temperature. Imagine you are piloting a ship towards a harbour. You need to stop right at the jetty. You could either go full steam ahead and try to apply reverse thrust just before you reach the jetty, but chances are you will overshoot and crash. Or, you could steam up slowly and coast to the jetty. This is the same with chicken - a slow roast gives you a larger window of opportunity to remove it from the heat at the desired cooking temperature. How important this is depends on how good you are at monitoring your chicken! If you have a Maverick ET-732 (or similar) type temperature probe, you can react the moment the alarm informs you the temp has been reached.
My peri-peri chicken, made with a brine-like marinade then cooked indirect until almost cooked, then finished over direct heat
Brining and marinades: chickens should always be brined. The reason: the salt within the meat promotes structural changes within the proteins which make the meat more tender. If you want to get scientific about it: the proteins maintain their 3D structure via a number of different types of bonds, but the most important is the positive-negative attraction between different amino acids. Na+ alters the charge of the proteins, promoting its unfolding. Also, the salt helps the meat hold on to water, causing less moisture loss. If you look up brining recipes, you will find a multitude of them - dry brines, wet brines at different concentrations, and injection brining. Which is the best? Well fortunately for you, I have done experiments!
- dry brining: not recommended. This method draws moisture out of the chicken and results in a taste and texture resembling cured meat.
- marinades: a form of wet brining but using far more concentrated flavours with less precise control over salinity. I have yet to come across a marinade recipe (including my own) which isn't subjective and variable. The results can be delicious, but really I didn't intend this post to be a discussion on marinading.
- wet brining: the most popular brining method. If you look up a number of books, you will see that some people (like Heston) recommends an 8% brine for 8 hours. Thomas Keller recommends a 5% brine for 12 hours. (NB: an 8% brine is 8g of salt per 100g water). I did an experiment where I brined three chicken breasts in different concentrations and found that the lowest concentration (a 4% brine for 12 hours) resulted in the most moist, succulent chicken - but unlike the other brines, a low concentration brine is not enough to season the chicken - so you have to add more seasoning afterwards.
Wet brining was my go-to method for the past year, but it has a major drawback. The same effect that causes moisture to hang on to the meat also causes moisture to hang on to the skin. I cooked beautifully moist chicken with rubbery skin for two years, trying all sorts of methods to crisp up the skin before I realized what was happening and junked the technique. My current recommendation is:
- injection brining: in this technique a brine solution is injected into the meat and allowed to equilibrate for at least 2 hours before cooking. You inject 20% of the weight of the chicken in brine - for a 2kg chicken you need to prepare 400mL of brine. The major advantage, apart from crispy skin, is flavour and cost. If you want a lemon or bay leaf flavour in your brine, you need to add much less to make only 200mL of brine as opposed to 4L of brine you need for wet brining!

 ...I'll bring the wine; white's good?