Analog Magik
- Thread starter Tirebiter
- Start date
You are using an out of date browser. It may not display this or other websites correctly.
You should upgrade or use an alternative browser.
You should upgrade or use an alternative browser.
Hello @mtemur. For some reason I did not see a notice that you hailed me here and only now saw it by accident.Dear @J.R. Boisclair, @Balle Clorin, and @tony22,
You’ve drawn conclusions about test records and how they’re cut, but there are important aspects you’re missing. Let me explain:
1. Azimuth Measurements Without Lacquers
First of all, you’re measuring test records for azimuth, but you don’t have access to the lacquers of those test record. It’s impossible to evaluate cutting accuracy solely based on azimuth measurements. @J.R. Boisclair, please don’t bring up zenith error here—I’m focusing only on azimuth because the findings others are discussing are based on that. While I agree zenith errors are more critical and related to cutting, and I know your findings are the result of meticulous work but in order to keep things simple, it’s better to focus on azimuth for now.
2. Impact of Electroplating and Pressing on Azimuth
There are several electroplating stages, and azimuth can shift between these steps because the mother, father, and stamper are all thin metal discs. These discs aren’t perfectly flat on a microscopic level—they’re like fabric with tiny imperfections after washing. Additionally, a stamper may not be perfectly mounted in the mold, and errors during flattening of stamper or pressing of record can exacerbate the issue. Pressed records may also exhibit micro-warps or larger warps caused by mishandling during pressing or insufficient cooling. Without access to the lacquers, it’s impossible to evaluate the cutting azimuth accurately or identify the provenance of problems. Impossible to decide whether it’s a cutting issue or pressing issue.
In our research, we have been surprised at what we actually CAN see with respect to geometric errors during cutting. Our paper will be submitted soon and you can read about what we discovered.
You are right, but in this case I would suspect a less than ideally functioning cartridge. Still workable, but there is an issue with damper asymmetry or coil shift.3. Channel Separation Goals
Judging azimuth based on channel separation alone misses the point. The goal isn’t achieving identical separation numbers for both channels but achieving the highest possible separation for each. For instance, 28dB L / 28dB R is worse than 26dB L / 35dB R. A discrepancy in channel separation doesn’t necessarily indicate a problem, as long as it leads to optimal azimuth alignment and minimal phase error. Different test records may show mismatched numbers, but both can still be valid as long as they point to the same or similar azimuth alignment.
Excellent point.4. Impact of Warped Records on Azimuth
Records, like stampers, aren’t perfectly flat. Microscopic warps affect azimuth. I’ve observed this myself—when I flatten my test records using an ORB disc flattener, I notice slight improvements in azimuth. Similarly, when I measure azimuth on a vacuum hold-down turntable, the discrepancies between test records are reduced. This confirms that a vacuum hold-down effectively flattens records.
We don't align the stylus for azimuth at all. We align the coils relative to the 45 degree groove walls. We DO measure to ensure the profile of the stylus can handle whatever azimuth angle we prescribe in such cases where the optimal azimuth angle exceeds 1.5 degrees.Conclusion
Please avoid making assumptions about the cutting stage based solely on azimuth measurements, as there isn’t enough information to draw definitive conclusions. A single test record isn’t sufficient for such judgments. Any issues could stem from the cutting technician, electroplating, pressing, or a combination of these factors—we simply don’t know.
Additionally, don’t make assumptions about the azimuth of a test record unless you’re using a vacuum hold-down turntable or at least a disc flattener. Align azimuth as I’ve explained above.
If you don’t trust test records, there’s no better alternative. WallyService (cartridge evaluation), for example, does not provide true azimuth alignment. Its assumption based approach (it’s does not involve actual alignment on tonearm) ensures stylus perpendicularity in the groove—if you’re lucky enough to achieve it—and costs over $500 per cartridge. If you have an expensive cartridge Wally service can make sense but proper azimuth alignment involves aligning the coils, not the stylus.
How do you optically align/measure azimuth based on coils axis when it’s impossible to see coils on some cartridges?We don't align the stylus for azimuth at all. We align the coils relative to the 45 degree groove walls. We DO measure to ensure the profile of the stylus can handle whatever azimuth angle we prescribe in such cases where the optimal azimuth angle exceeds 1.5 degrees.
If you’re using an oscilloscope or similar equipment based measuring signal coming from coils then how it’s any different than the standard method with test records?
Yes, of course. Electrical measurement for optimal azimuth is the only way to go. Please forgive me. Perhaps I was mistakenly conflating another person’s comment with yours.How do you optically align/measure azimuth based on coils axis when it’s impossible to see coils on some cartridges?
If you’re using an oscilloscope or similar equipment based measuring signal coming from coils then how it’s any different than the standard method with test records?
I’m working too hastily again when on this forum.
Thanks J.R for explaining.Yes, of course. Electrical measurement for optimal azimuth is the only way to go. Please forgive me. Perhaps I was mistakenly conflating another person’s comment with yours.
I’m working too hastily again when on this forum.
Last edited:
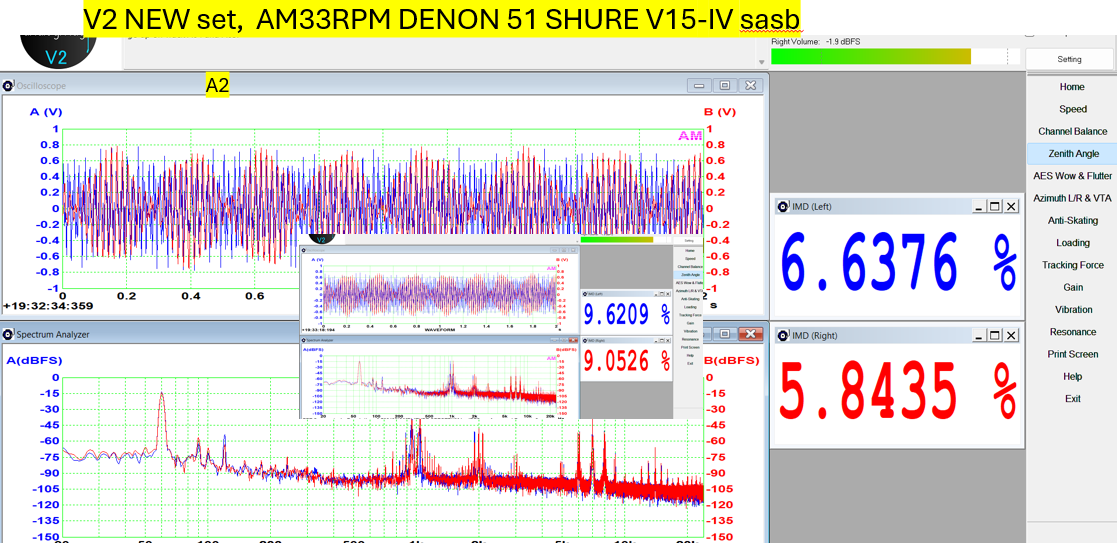
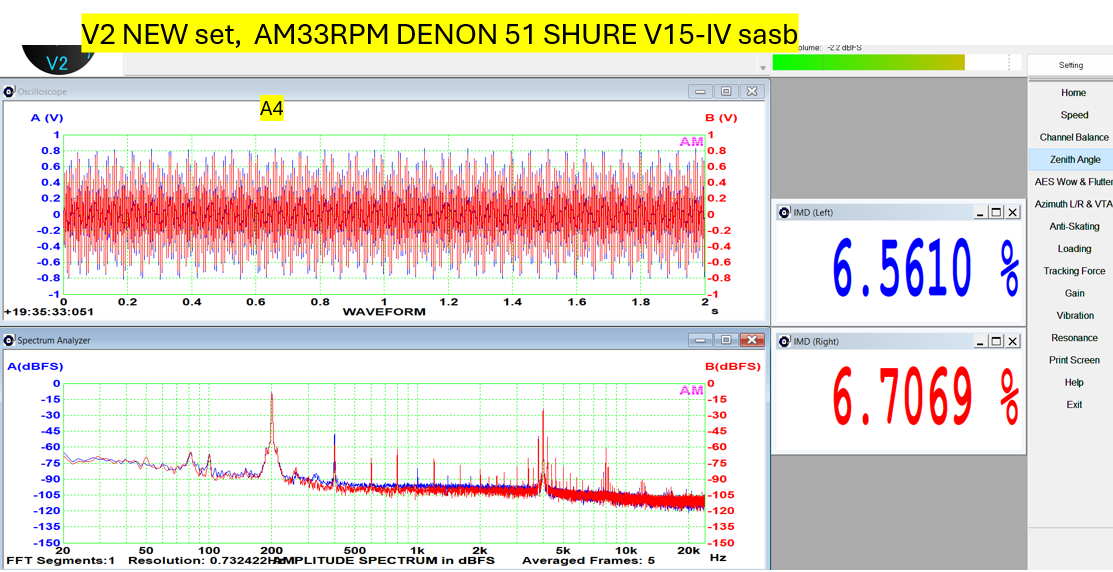
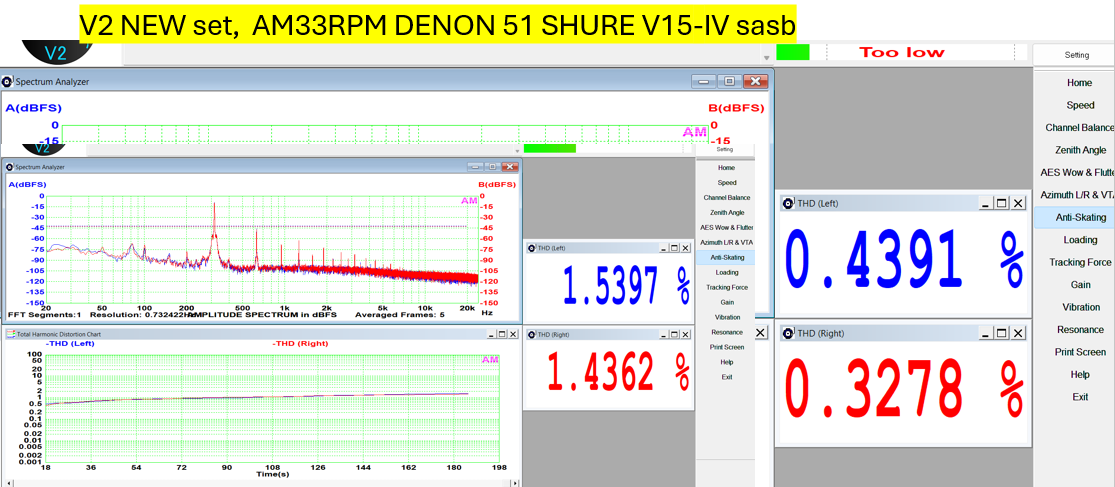
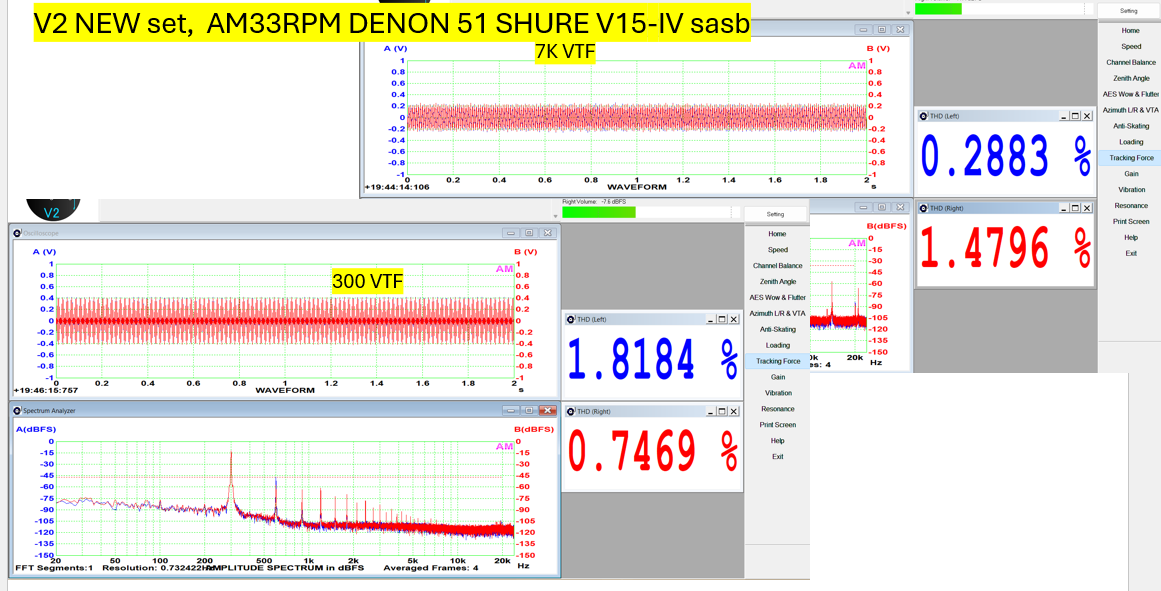
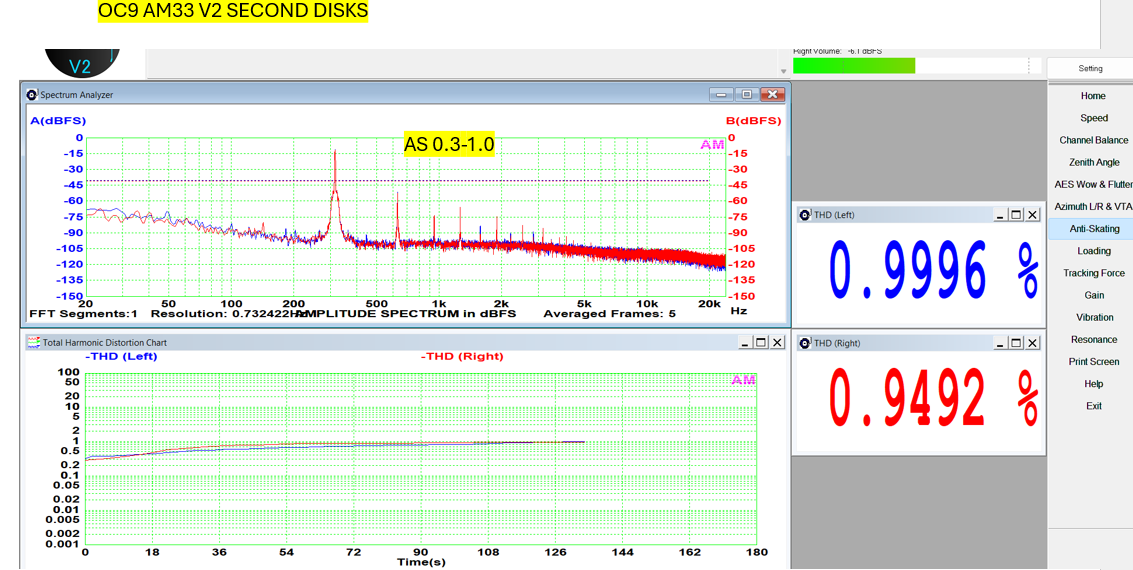
Second set of V2 records, first 1 set was returned. Second set was cherry picked and hand selected. 33rpm records are better than45rpm..
I need to tabulate the data into an Excel table one day....but this is the results on my V2. Setup was optimised on Toshiba and Ortofon test records. The turntable has a electronic dampening of the arm that dampens arm-cartridge resonance No brush used on Shure at 1.25gram
I need to tabulate the data into an Excel table one day....but this is the results on my V2. Setup was optimised on Toshiba and Ortofon test records. The turntable has a electronic dampening of the arm that dampens arm-cartridge resonance No brush used on Shure at 1.25gram
Attachments
Last edited:
Last edited:
@Balle Clorin I checked AM results you shared. First and foremost the lateral resonance test of Denon 51 and Shure cartridge indicate some problems. Most probably the tonearm isn't up to the task. Not good enough to hold cartridge steady. Another possibility is deteriorated cartridge damper. On the other hand the tonearm on Gyro and damper of AT OC9 cartridge are doing their job well. IMHO other parameters are also looking good on Gyro-OC9 combo.
Cannot place picture where I want too. Resonance with other test records
The vertical resonance for the Shure /Jijo looks like above when varying the damping. So I think it is ok
But I know from other test the thin light Denon arm is not the best…
Last edited:
It appears that the brush in front of the stylus is the culprit. I wouldn’t use it. It looks like it interferes with the suspension of the cartridge and arm.


Cannot place picture where I want too. Resonance with other test records
The vertical resonance for the Shure /Jijo looks like above when varying the damping. So I think it is ok
But I know from other test the thin light Denon arm is not the best…
I am not sure what you consider to be the problem . I stopped using the brush some time ago , not used in my AM posts here, It added noise below 40hz, but it dampens resonance well .. pick your poison
Thank you Balle.....[assume you have not done so yet]
Can you pick your best tonearm and your best preferred cart then do a 'best of your ability' setup...
Then do a full AM VI setup and picture report...then without adjusting anything a full VII report ....
Interested to see you best VI setup figures and then how the VII figures differ or setup in reverse depending on which VI or VII you trust first....
[Can also provide same setup but AP record with AM I or II]
Would also be interested in mtemur's figures....
This is not a competition for best figures...just an example of what is achieved....all carts, arms and TT's will give different results
Already posted V1 and V2 on my Michell Gyro SE SME V AT OC9MLii . Set up based on Toshiba LF-90001 on for crosstalk . It is the median of 20+ crosstalk tracks. VTA adjusted 2mm based on AM results but nothing else based on AM . The VTA of my OC9 setup is 22 according to the DIN record , but based on AM I remove the platter mat so the VTA is 22.5 in my posts here.. I do not yet have the motivation to change my Gyro setup.
I think my setup is quite good, my only concern is the zenith.
But I will do a full AM setup on a third TT Sony PS -212 with AT95E
I think my setup is quite good, my only concern is the zenith.
But I will do a full AM setup on a third TT Sony PS -212 with AT95E
Last edited:
Belle, did I ask you this already? Which tracks in the LF-90001 do you use for crosstalk checking?Set up based on Toshiba LF-90001 on for crosstalk
Optimised AT95E on Sony ps-212 yesterday. This is how far I got not sure why A4 and 5 have 10 and 30%IMD
Tweaked Azimuth not zenith but anything below 6 is good for this cart. Antiskate distortion seem a bit off ..
Noisefloor is 10db worse on the low end table…
I noticed that tweaking VTA made a big difference on crosstalk , less vta made AM closer to The Ultimate test record (-29.9/-30.4)


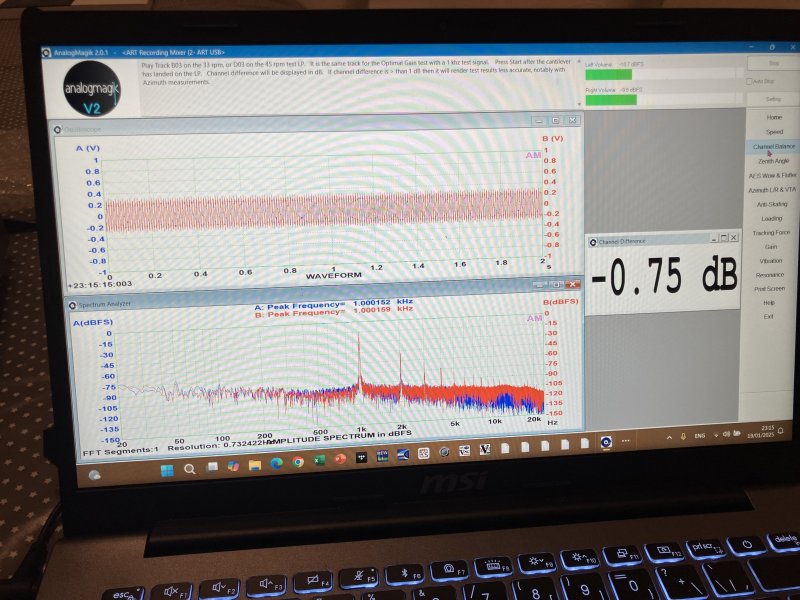


Tweaked Azimuth not zenith but anything below 6 is good for this cart. Antiskate distortion seem a bit off ..
Noisefloor is 10db worse on the low end table…
I noticed that tweaking VTA made a big difference on crosstalk , less vta made AM closer to The Ultimate test record (-29.9/-30.4)


Last edited:
Yes, I think that's what I used, but I got some very odd results compared to all my other test records. I'll have to check it again.The 440hz L and R think it is track 3 or 4
the track is too short to work well with AM...avoid the comments.
Also, try without RIAA eq=Flat
Also, try without RIAA eq=Flat
Last edited:
Similar threads
- Replies
- 21
- Views
- 877
| Steve Williams Site Founder | Site Owner | Administrator | Ron Resnick Site Owner | Administrator | Julian (The Fixer) Website Build | Marketing Managersing |


