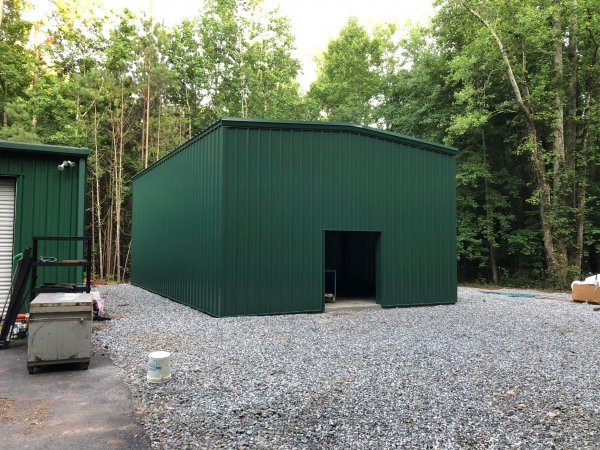
Dedicated audio room build thread aka The Big Dig
- Thread starter HughP3
- Start date
You are using an out of date browser. It may not display this or other websites correctly.
You should upgrade or use an alternative browser.
You should upgrade or use an alternative browser.
Its been a while since i posted. Projects as rare as this complicate things, framers, electricians, availability of materials etcc. I actually had 2 framers turn the job down. Thankfully i found a crew that is actually excited to do it.
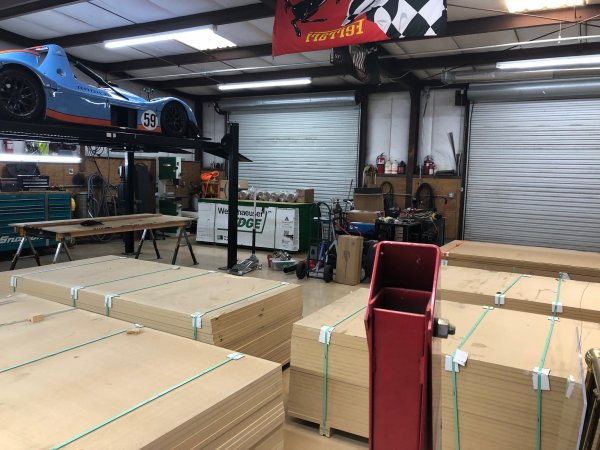
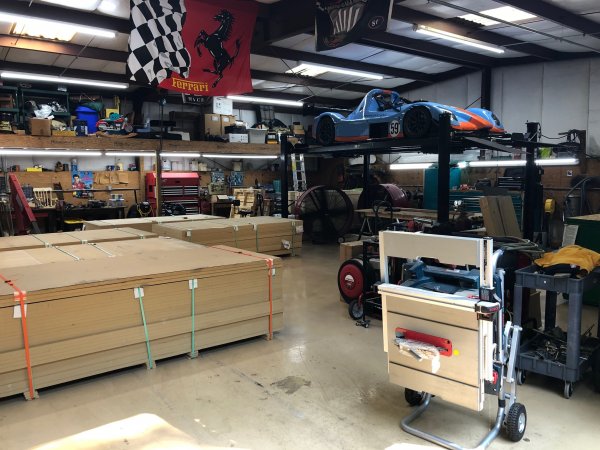
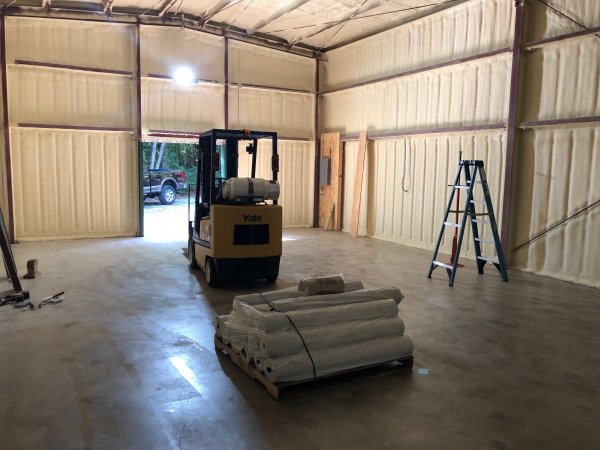
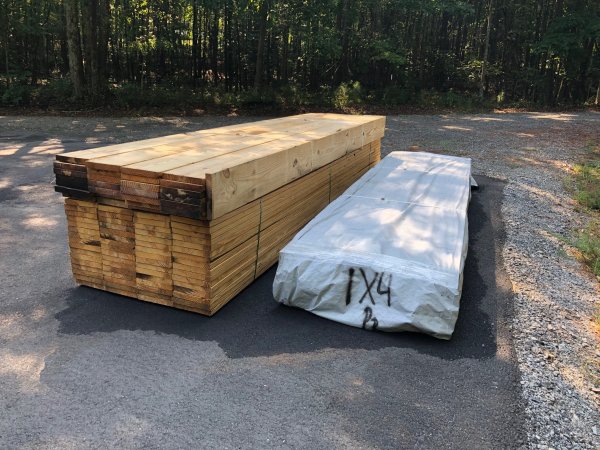
So the framing, I hope, starts late next week! Attached are pictures of material staged in my shop next door. In addition (and more of an interest to WBF), Dennis Foley and I are excited to share the room construction design. To be clear, Dennis calculates then renders the wall and ceiling design/materials but does not get into the actual construction how-to. Much like an Engineer that submits a design to Fabrication, its up to the Fab group to figure out how to make it, which is where I jumped in.
First the initial materials and component list (finished wall covering not decided on yet but will be 3/4" thick):
2"x12"X16' pressure treated - 4 count
2"x12"x8' pressure treated - 6 count
2"x12"x16' #2 grade - 93 count
Laminated beams 3 1/8"x11"x22' - 24 count
3/4"x4'x8' OSB - 52 count
2,000 lbs of 1/8" Acoustimac mass loaded vinyl
Owens Corning SAB bats - amount not yet determined
For Diaphragmatic Carbon filters: Yes I am building these....
171 filter boxes to be inserted in wall stud space
10,000lbs of activated carbon
1"x4"x8' #2 grade - 349 count
50 yard rolls of burlap fabric - 8 count
1/4" x 4' x 8' pegboard sheet - 50 count
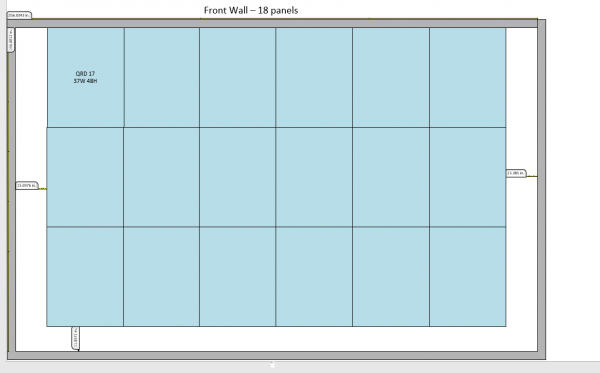
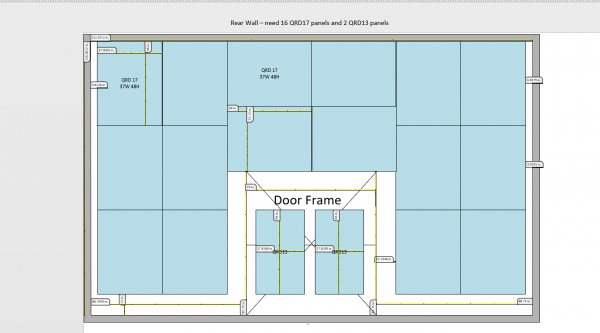
17 well QRD diffusers kits - total of 34 diffusers
Dennis will CNC cut kits for me but I will assemble...
Frequency Response: 225 Hz. – 3,400 Hz
37? w x 48? h x 16? solid cherry
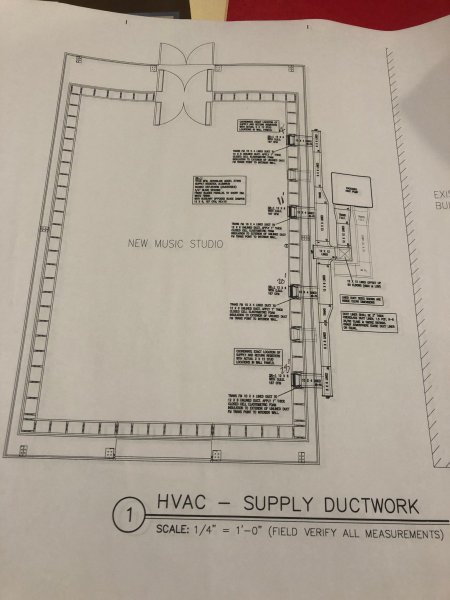
Room Dimensions will be 21'x31'x13'
Wall design:
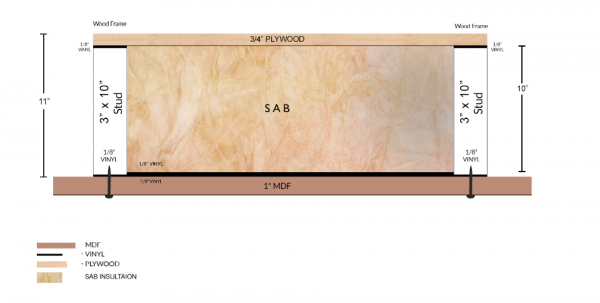
The walls will be based on 12" stud. Dennis calculates wall materials needed per the room dimensions + other factors such as floor and ceiling build. I will have a slab floor covered in carpet/cushion. The big issue is weight of a 13 foot wall given the cross section designs below. Each sheet of MDF weighs 125lbs. Each stud space will have an alternating material stack as below per design.
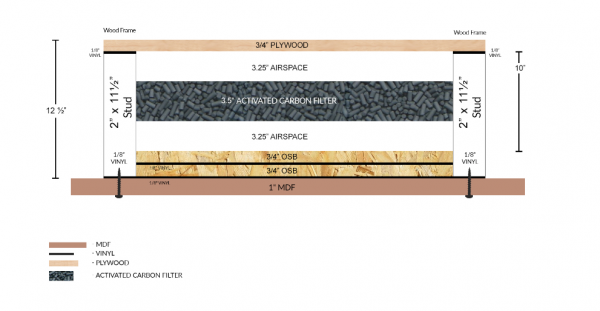
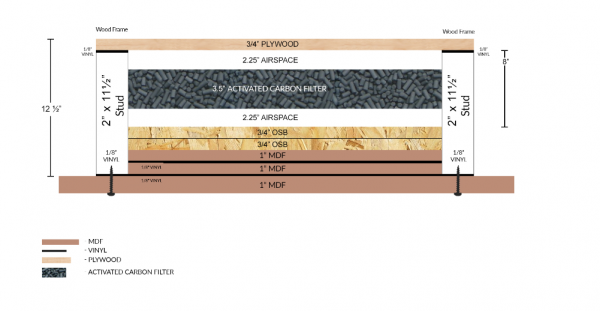
The studs will be 16" on center. Due to weight, I designed the wall to be constructed in sections and in a particular sequence of materials.
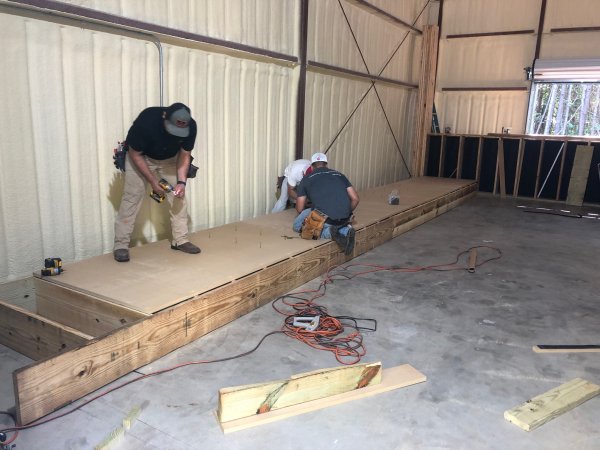
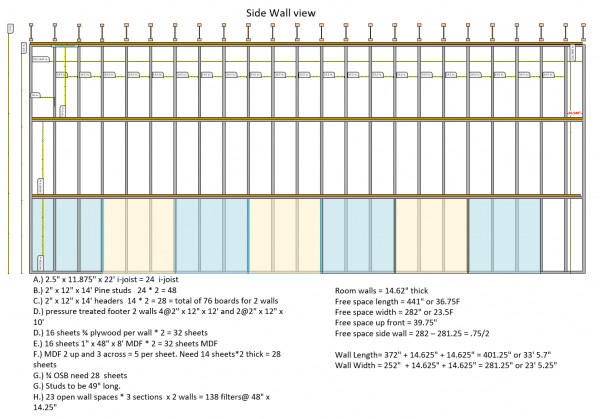
The 13 foot wall be in 4' 4"H x 4W' sections. The floor plate will be bolted to the floor using concrete wedge style anchor bolts. The section will have the 1" MDF and 1/8" vinyl on exterior only. The lower section will then be erected, then the next level will go on top. I have a forklift already and it will be used to pick up each section. The Framers have a scissor lift to help position and screw/bolt/glue each section together.
QRD front and rear wall renderings:
The door will a French style opening but will be constructed just like the walls including carbon filters. Yes weight will be an issue but I am sure we can engineer it.
Current Ceiling design:
The joists will be an LVL style beam with dimensions of 3 1/8" x 11" x 22 feet - 16"OC. this gives the ceiling mass. I was going to use I-Joist but Dennis said absolutely not because we need mass. Otherwise all his calculations will be way off. I may do Carbon in the ceiling but have not decided yet. The ceiling be box ended with MDF.
The Goal of the room is to make it such that if turned upside down and put in water, it would float. So all spaces must be sealed off.
Electrical:
I have purchased a TORUS wall mount 60AMP AVR system. Will use 10 gauge copper wire and Furutech GTX-S receptacles. Building, service panel and AVR will all be grounded to steel post.
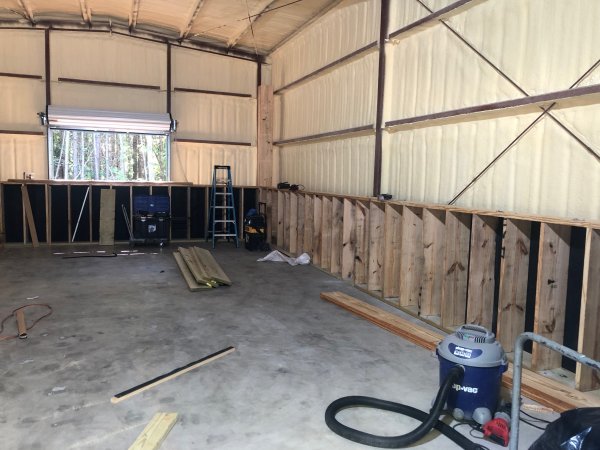
Staged material and where I will be feverishly building:
Again - Appreciate any feedback. Yes a long post... but thanks for reading.
Cheers - Hugh
So the framing, I hope, starts late next week! Attached are pictures of material staged in my shop next door. In addition (and more of an interest to WBF), Dennis Foley and I are excited to share the room construction design. To be clear, Dennis calculates then renders the wall and ceiling design/materials but does not get into the actual construction how-to. Much like an Engineer that submits a design to Fabrication, its up to the Fab group to figure out how to make it, which is where I jumped in.
First the initial materials and component list (finished wall covering not decided on yet but will be 3/4" thick):
2"x12"X16' pressure treated - 4 count
2"x12"x8' pressure treated - 6 count
2"x12"x16' #2 grade - 93 count
Laminated beams 3 1/8"x11"x22' - 24 count
3/4"x4'x8' OSB - 52 count
2,000 lbs of 1/8" Acoustimac mass loaded vinyl
Owens Corning SAB bats - amount not yet determined
For Diaphragmatic Carbon filters: Yes I am building these....
171 filter boxes to be inserted in wall stud space
10,000lbs of activated carbon
1"x4"x8' #2 grade - 349 count
50 yard rolls of burlap fabric - 8 count
1/4" x 4' x 8' pegboard sheet - 50 count
17 well QRD diffusers kits - total of 34 diffusers
Dennis will CNC cut kits for me but I will assemble...
Frequency Response: 225 Hz. – 3,400 Hz
37? w x 48? h x 16? solid cherry
Room Dimensions will be 21'x31'x13'
Wall design:
The walls will be based on 12" stud. Dennis calculates wall materials needed per the room dimensions + other factors such as floor and ceiling build. I will have a slab floor covered in carpet/cushion. The big issue is weight of a 13 foot wall given the cross section designs below. Each sheet of MDF weighs 125lbs. Each stud space will have an alternating material stack as below per design.


The studs will be 16" on center. Due to weight, I designed the wall to be constructed in sections and in a particular sequence of materials.
The 13 foot wall be in 4' 4"H x 4W' sections. The floor plate will be bolted to the floor using concrete wedge style anchor bolts. The section will have the 1" MDF and 1/8" vinyl on exterior only. The lower section will then be erected, then the next level will go on top. I have a forklift already and it will be used to pick up each section. The Framers have a scissor lift to help position and screw/bolt/glue each section together.

QRD front and rear wall renderings:
The door will a French style opening but will be constructed just like the walls including carbon filters. Yes weight will be an issue but I am sure we can engineer it.


Current Ceiling design:
The joists will be an LVL style beam with dimensions of 3 1/8" x 11" x 22 feet - 16"OC. this gives the ceiling mass. I was going to use I-Joist but Dennis said absolutely not because we need mass. Otherwise all his calculations will be way off. I may do Carbon in the ceiling but have not decided yet. The ceiling be box ended with MDF.

The Goal of the room is to make it such that if turned upside down and put in water, it would float. So all spaces must be sealed off.
Electrical:
I have purchased a TORUS wall mount 60AMP AVR system. Will use 10 gauge copper wire and Furutech GTX-S receptacles. Building, service panel and AVR will all be grounded to steel post.
Staged material and where I will be feverishly building:


Again - Appreciate any feedback. Yes a long post... but thanks for reading.
Cheers - Hugh
Steve williams
Site Founder, Site Co-Owner, Administrator
For electrical I'd consider using some duplex receptacles, for example if you have monoblock amps a line run to a duplex with both amps plugged into the duplex would work well and cut down on costs, as I'd also consider the wall plate and cover for them as well. You could also have a couple of duplex receptacles for digital front end gear...
Since you're building all this stuff you could build boxes for the receptacles out of 1" alum plate and install them in the walls or bolt them to the walls. Then bolt the receptacle's wall plates to the alum box. You need a separate box for each line you're running or one big box with the receptacle grounds isolated from the box. Optionally, each box/line could contain a block of carbon/graphite, ground would be run through it via spring loaded banana connectors or something, which will filter the ground and make for a blacker background. You could also experiment with adding capacitive filtering to digital front end receptacles.
Those walls look like crazy overkill, wow!
Super cool. But I do have to tell you that MLV is not a constrained layer. MLV needs to free hang or you're wasting a shit load of money. It should go in the airpockets, and you run it horizontal to have as few of gaps in it as possible.
If it's the ONLY thing you can find to put between parts to reduce friction between them, well, use it that way. But I have to imagine it's the most expensive option for that.
Personally if I wasn't worried about neighbors I'd skip the MLV and stuff the walls full of your carbon stuff and denim insulation, and use wood over the top because it has a very even sound.
Super cool. But I do have to tell you that MLV is not a constrained layer. MLV needs to free hang or you're wasting a shit load of money. It should go in the airpockets, and you run it horizontal to have as few of gaps in it as possible.
If it's the ONLY thing you can find to put between parts to reduce friction between them, well, use it that way. But I have to imagine it's the most expensive option for that.
Personally if I wasn't worried about neighbors I'd skip the MLV and stuff the walls full of your carbon stuff and denim insulation, and use wood over the top because it has a very even sound.
Hello Folsom, I will ask Dennis about this. I just read exactly the same thing, it needs to be floppy to work best. Maybe the renderings show the mlv in the wrong place. I have reached out to him. I know sometimes he has staff that does these. Appreciate the heads up.
Dennis responded below.
It's not used as a barrier for middle and high frequencies. For that function, you are correct, it needs to be suspended in the air. It is used as a viscoelastic damping compound. It's vibration management, not airflow dependent. Barrier technology for noise management at lower frequencies is vibrational acoustics.
It's not used as a barrier for middle and high frequencies. For that function, you are correct, it needs to be suspended in the air. It is used as a viscoelastic damping compound. It's vibration management, not airflow dependent. Barrier technology for noise management at lower frequencies is vibrational acoustics.
That's what I thought it could do, but is there nothing cheaper that would do the same thing? I mean... $$$$. It seems like there should be plenty of other rubberish products.
Wow!  Those are HEAVY layers of OSB and MDF to fill in the cavity. Is all that a massive glue sandwich? Seems like it would be hard to keep it all stuck together during construction.
Wow!Those are HEAVY layers of OSB and MDF to fill in the cavity. Is all that a massive glue sandwich? Seems like it would be hard to keep it all stuck together during construction.
jturbo - the wall section will be erected only with the exterior MDF/MLV layer. Once all sections are up (all walls erected), then apply the other sandwich sections in the stud cavity. We can pre-build the layers and attach as a units. Should not be too heavy. Then install the carbon filters, then wiring, then final interior paneling. A/C cutouts will be done before the walls are erected, then layers will be cut to fit around them. Only a few carbon filters will need to be made differently to fit. Easy right
jturbo - the wall section will be erected only with the exterior MDF/MLV layer. Once all sections are up (all walls erected), then apply the other sandwich sections in the stud cavity. We can pre-build the layers and attach as a units. Should not be too heavy. Then install the carbon filters, then wiring, then final interior paneling. A/C cutouts will be done before the walls are erected, then layers will be cut to fit around them. Only a few carbon filters will need to be made differently to fit. Easy right
Stunning! I think I would be tempted to screw the prebuilt MDF/OSB sandwich blocks to the exterior 1in MDF/MLV sheet. Seems like glue might pull away from exterior MDF/MLV layer over time. Not sure if screws would have a sonic effect tho.
Correction on materials. I left out 125 sheets of 1”x4’x8’ MDF.
Dennis has made a compelling case for an all carbon ceiling. It’s 20% of the room mode corrections needed. So Another 7k lbs of carbon. With this addition, calculations now show the room at very hi resolution and a +-.5 dB should be audible.
Higher frequency will be handle by water cut foam panels on walls and ceiling. 20 on the each side wall and 20 on ceiling.
I don’t pretend to understand the simulation runs but Dennis tells me All issues are addressed for maximum impact. The low end will be as tight and defined as the mid ranges. The soundstage width and depth will exceed room dimensions.
Stunning! I think I would be tempted to screw the prebuilt MDF/OSB sandwich blocks to the exterior 1in MDF/MLV sheet. Seems like glue might pull away from exterior MDF/MLV layer over time. Not sure if screws would have a sonic effect tho.
Yes will be screwed for sure, too heavy.
Hi HughP3,
Thank you for sharing your project. This has been a very interesting read so far. You are very fortunate to be able to do this project. I have a gut feel that this project will contribute more to improving the sound you hear than any equipment. I look forward to reading further progress of this project.
Thank you for sharing your project. This has been a very interesting read so far. You are very fortunate to be able to do this project. I have a gut feel that this project will contribute more to improving the sound you hear than any equipment. I look forward to reading further progress of this project.
Knowing the cost of remodeling/building out my room, I'm afraid for your bank balances. Clearly you're swinging for the fences. Bravo!
Thanks Bob and your spot on, my wallet is in hiding. but there is no turning back at this point or I jeopardize the build. Interesting that the biggest expense by far is the raw activated carbon. The size of the room calls for so much to of it.
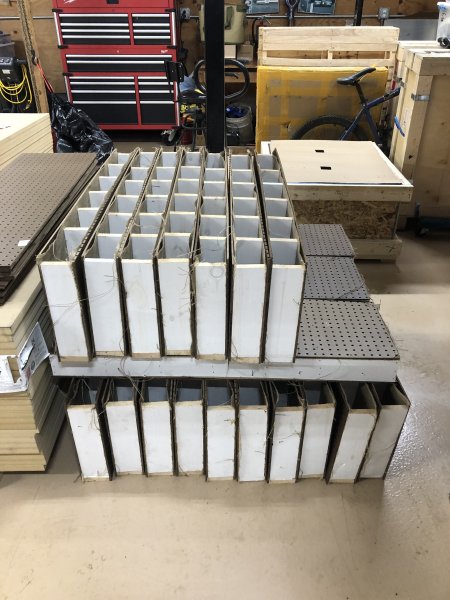
Here is a pic of a few filter boxes. I am going to need a billizion of them. It’s taking me a little less than 10 minutes per box. I still have to fill and close off. I have no room for the carbon until more of the materials are consumed. Maybe a month out for it.
Here is a pic of a few filter boxes. I am going to need a billizion of them. It’s taking me a little less than 10 minutes per box. I still have to fill and close off. I have no room for the carbon until more of the materials are consumed. Maybe a month out for it.
Attachments
Similar threads
- Replies
- 2
- Views
- 636
- Replies
- 6
- Views
- 1K
- Replies
- 272
- Views
- 18K
| Steve Williams Site Founder | Site Owner | Administrator | Ron Resnick Site Owner | Administrator | Julian (The Fixer) Website Build | Marketing Managersing |


